IPv6 fixes the address shortage on IPv4. Most people still have their own WAN address but as new technologies emerge ISP’s are slowly going the route of Carrier NAT. Xplornet only offers you a 10.x IP address on their LTE with no option for a static IP. I could do some fizzles and pay money for another IPv4 address on my VPS ( Digital Ocean ). Since all my stuff is setup IPv6 why not bring some of those address’s down to my LAN since it costs nothing.
He.net Tunneling
Hurricane Electrics IPv6 tunnel broker offers you free IPv6 tunneling. This uses Protocol 41 which I was unable to pass directly through to them. It also requires a staticish IP. Since my IP is a in pool and randomly changes this is not the solution for me.
The Solution
My solution is to run an OpenVPN connection to my VPS. This allows me to access my LAN IPv4 and to push a /48 to my home network.
I drew up a quick visio diagram of my basic network as it sits at home.
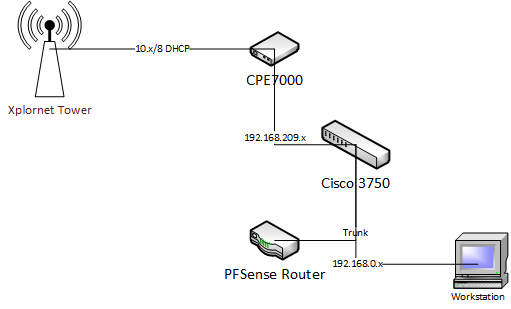
To quickly explain it:
- The CPE7000 Radio obtains a DHCP address off the Xplornet Tower (10.x/8)
- My PFSense router obtains a 192.168.209.x/24 IP using DHCP from the CPE7000
- My Workstation obtains its IP off of the PFSense’s DHCP server on the 192.168.0.x
The PFSense router will be making the OpenVPN connection. Since it is only 500MHz I have chosen to disable encryption. If your machine is quicker I definitely recommend encryption.
What I used for my Setup
- PFSense 2.x on a Soekris 5501
- FreeBSD 10.2 on Digital Ocean VPS
- /64 and /48 from Hurricane Electric
- SSH access to your router
Digital Ocean VPS
Go ahead and sign up for a Digital Ocean VPS. A $5 a month VPS will work excellent for this task. Use the following link to save $10:
Use whatever Operating system you would like, hurricane electric has scripts setup for just about every OS you can think of. I prefer FreeBSD but lot of people prefer Debian or CentOS those also work too. Once you signed up and deployed your first server follow the instructions to login to root. Once in root go ahead and obtain your IPv4 IP. You will need this for Hurricane Electric to place in the IP box on your tunnelbroker account.
Configuration on VPS
Setup the IPv6 tunnel using the instructions provided by your distro:
Once you are up and running test everything out by pinging google.
ping6 google.com

Enable Routing
To turn your VPS into a router so it can forward packets for you make sure to turn on forwarding below are some instructions to help you:
Hurricane Electric
Sign up to Hurricane Electric’s Tunnel Broker
Once you sign up assign yourself a /64 and also a /48.

Since my VPS was in New York I used the New York tunnel to keep latency low.
chris@cloud ~]$ ping6 2001:470:1f06:1038::1
PING6(56=40+8+8 bytes) 2001:470:1f06:1038::2 –> 2001:470:1f06:1038::1
16 bytes from 2001:470:1f06:1038::1, icmp_seq=0 hlim=64 time=1.662 ms
This is excellent 1ms latency to he.net I am assuming it is in or near the same datacenter as my VPS.
OpenVPN – VPS Side
Setting up OpenVPN is very simple as we will just use a secret key to get things started quickly. You can of course upgrade the security at your need. Run this command on your VPS to generate a static key. Keep this key as PFSense will also need a copy of it.
openvpn –genkey –secret static.key
Copy this key to the OpenVPN config location (/usr/local/etc/openvpn on BSD) (/etc/openvpn on Debian and friends).
Here is the OpenVPN Configuration I used on the VPS. This will be our “server”
dev tun
proto udp
ifconfig 10.8.0.1 10.8.0.2
keepalive 10 120
secret /usr/local/etc/openvpn/static.key
cipher none
route 192.168.0.0 255.255.255.0
#IPv6 Goodies
tun-ipv6
push tun-ipv6
ifconfig-ipv6 2001:****:****::1 2001:****:****::2
route-ipv6 2001:****:****::/48
There are a few lines you may have to customize for your deployment:
- ifconfig 10.8.0.1 10.8.0.2 <- This can be kept the same, if you already have another VPN using this change the subnet.
- route 192.168.0.0 255.255.255.0 <- This is the local LAN you are running on your PFSense router. Again, change to match your configuration.
- ifconfig-ipv6 2001:****:****::1 2001:****:****::2 <- Put your /48 in there. This will use 2 IP’s off the first /64 for the link between routers.
- route-ipv6 2001:****:****::/48 <- Put your /48 in there. This will route all your /48 to your PFSense box.
This is only running a server so it does not connect to anything. I am assuming your not running a firewall (yet).
PFSense
Ensure your PFSense setup is up and running. The default settings should pretty much cover it. Ensure your client computers are able to access the internet.
- Login to the PFSense Interface (Default: http://192.168.0.1)
- Click on VPN -> OpenVPN -> Client
- Create a Client VPN4. Fill in the information similar to above, just ensure you connect to your VPS. This can be a hostname or an IP if you don’t have DNS available. Interface is the interface your internet connection is on
5. Scroll down, put in your private key you generated earlier into the Cryptography Settings
6. Ensure your routes and such look similar to mine

- IP Tunnel Network -> Ensure this is the network you setup for OpenVPN earlier
- IPv6 Tunnel Network -> This will be your /48 from he.net. Ensure you use ::1 as the IP. OpenVPN automatically sets it to ::2 internally.
- IPv4 Remote Network -> Since my VPS is not running anything I want to directly route to it I left it blank.
- IPv6 Remote Networks -> You will see I have 2 networks. My /48 and the /64 that is assigned as ::1 and ::2 for the he.net tunnel.
- The rest of the settings are left default as they do not need to be changed.
7. Open up ICMP on the OpenVPN network and allow ALL IPv4 as there is nothing globally routable on there.

8. Also ensure IPv6 and IPv4 are globally allowed on your LAN network. This will block your outgoing traffic and is usually not wanted.

Verify it all works as of now
Now lets test things out and make sure they work. Although the internet will not work at your house you should be able to ping both sides of the tunnel.
ping6 2001:****:****::1
ping6 2001:****:****::2

Both of these should come back with active replies. If not, then there is an issue with your VPN, it works then lets go ahead and make this work on the internet.
Manually set a IPv6 Gateway (Hack/Bug?)
This part is the only part I can’t seem to figure out how to automate. This means that each time your router reboots you have to manually login to set the default v6 gateway. I tried using the pfsense GUI but it will not let me add this as a gateway. I might have a configuration incorrect, or pfsense could just not be expecting this. Since I reboot my router max a few times a year this is not too bad for me. I will keep researching another solution to allow me to manually add the gateway.
System -> Advanced

Enable the Secure Shell
Login to your PFSense using SSH.
Username: root
Pass: <adminpassword>
Once logged in press “8” then enter
Paste this into your command line:
route add -inet6 default 2001:****:****::1
The IPv6 address is the ::1/64 that you put in for the OpenVPN link network.
Assuming this all worked properly you should be able to access the internet using your router. With the router SSH still open try a ping6 google.com and see if it makes it.

Now that the router is up and running we will go ahead and assign the IPv6 /64 for the LAN network and turn on radvd to broadcast the address’s.
Assigning a /64 to our LAN on PFSense
On the PFSense home screen goto Interfaces -> LAN:

- IPv6 Configuration Type <- Ensure this is a static IP all I did was take my /48 network from he.net and added a :1 before ::1 on the gateway address. So 2001:470:8b11::1 is my /48 then 2001:470:8b11:1::1/64 is my LAN network.
Next, go to Services -> DHCPv6 Server/RA then to the Router Advertisements tab

- Router Advertisements <- Unmanaged, this will have it spit out IPv6 address’s to any host that requests it using part of its MAC address.
Test it all
Now that this is operational give it a couple of minutes. I know on my Mac and Debian server it picked it up almost instantly.

That is it, enjoy IPv6 on your LAN.

Whats Left ?
I still have to figure out why PFSense won’t take my default gateway. Having to SSH in to get it working is definitely not optimal. If I ever get it working I will update this guide. Also DHCPv6 might be a good idea as it lets you set reverse DNS and manage the systems that are grabbing IPv6. As per this guide, I will get into opening ports for services and setting up stuff to run off there.
Thanks for reading,
Chris Sologuk